top of page

Scan Magic

  • Writer: Robin Nichols
    Robin Nichols
  • Jul 24
  • 4 min read

I've never owned a dedicated film scanner, that is, until last week, when I bought a Plustek OpticFilm 8200Ai film scanner - it was on special so seemed a bargain. But is it any good?

This scanner is designed for digitising transparencies (slides), as well as colour, and black-and-white negatives. The unit comes with two film holders: one for a six-frame film strip, and one that holds four mounted slides. Though made from plastic, both film holders are well designed, robustly built and slide from left to right or right to left through the access slots either side of the scanner. To scan a new image you simply load up the film in the holder, pull the holder through the aperture on the side of the machine - it 'clicks' solidly into position for each frame, giving a really precise feel to the alignment process. Some care has to be taken when loading mounted slides as each has to be oriented in the landscape format to avoid cropping - not an issue for six-frame film strips as each frame is of course landscape.


To process the scan, I use the SilverFast, software that's packaged with the hardware - so far I haven't bothered with the supplied Plustek software because SilverFast seems to be doing a great job.

In this straight comparison test, you can see how damaged the original slide is. The sky in particular shows a frightening array of scratches and dust particles. The left-hand frame has been scanned using SilverFast's infra red scan technology (iSRD) - this is added after the scan to detect, and more importantly, remove dust and scratches. I was a bit sceptical about this at first but once you see the amazing results this produces, I consider the scanner a great investment - just for this infra red scan feature alone.

In normal scan mode the Plustek scanner produces a 45Mb file in about 1:20 seconds at 3600dpi (using an M3 Pro Mac). Its highest resolution setting produces a whopping 175Mb file in just over five minutes (cranked up to 7200dpi). Totally useless for most enthusiast applications, unless of course you are scanning a small part of the original 35mm film.

I'd venture to say that SilverFast has too many features especially if you are not familiar with the scan process and terminology. That said, you can use its QuickScan button located on the front of the unit to make quality scans - but with fewer features visible to provide a simpler, more streamlined workflow. Great for beginners. Its Intelliscan button directly accesses SilverFast software and, I suppose, could be called its 'professional' mode. A preview scan takes about ten seconds.

Here's a great example of the power of SilverFast software. As you can see the slide is dirty - covered in blobby bits of something and there's also an underlying pattern of very fine scratches - defects to be expected in a slide taken in 1995. I sometimes try cleaning the film using a microfibre cloth and a puffer brush. This can help but it never gets rid of the damage entirely. I read somewhere that some photographers go to the trouble of rewashing the film in warm soapy water. Quite effective but if you are not really careful you run the risk of further damage. I used the puffer brush and, for the second scan, used SilverFast's ISRD (infra red) dust and scratches filter PLUS its ISRDx, which I believe is its post-scan, non-infra red, scratch removing filter (see below).
As you can clearly see, the processed scan is massively improved - there's still a bit of veining - very fine scratches, but these can be further reduced or even removed in post production. Bottom line is that even using out of the box tools, you can rescue damaged files and those with only a small amount of damage can end up looking (almost) like new. The software also has a masking feature - allowing you to restrict the action of the filter just to the relevant parts of the image (I have not tried that feature yet).

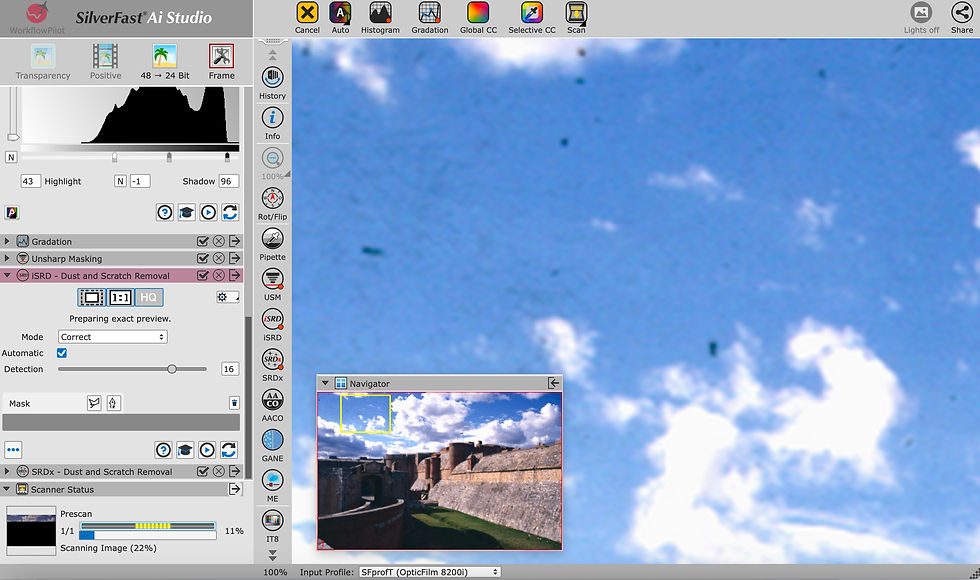
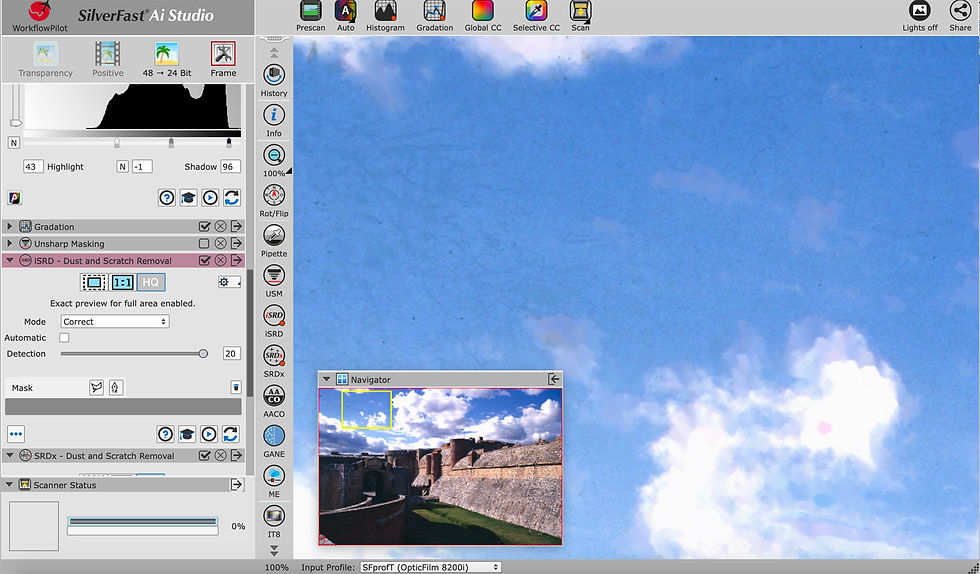
Other features in SilverFast (version 9) include: Histogram, Unsharp Masking, Bit Depth control, Negative and Positive (film source) settings plus a special setting for Kodachrome film which is designed to reduce its tendency to add a red bias to the file. You'll also find a Gradation tool, Navigator, Batch Processing, Zoom Tool, HDRi raw data capture, a History Palette, a gain filter (called GANE) for minimising film noise, plus a Dynamic Range of 3.91, pretty high for a consumer scanner - although I'm not sure that number is 100% accurate. Possibly helping boost the Dynamic Range is a filter called AACO or Auto Adaptive Contrast Control (honestly, who thinks up these tongue twisters?). AACO analyses and brings out additional shadow detail, thus giving the impression that the DR is higher than it really is. It sort of acts like an HDR file where several different exposures of the same file are combined to give a wider dynamic range although, looking at some of my test results, I'm yet to be convinced this is really a beneficial feature.

A note on flying birds

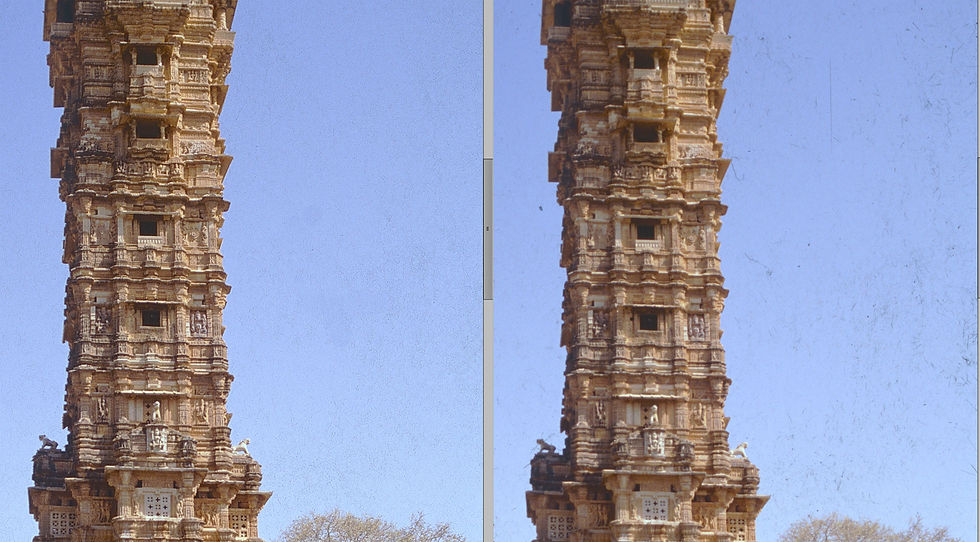
In my tests, I scanned quite a few slides that had birds flying in them - mostly quite large birds, but some small ones too, and was amazed to find that while the software did a good job of removing most of the dust and scratches, it often left the larger birds! I guess this is because the algorithm was set to only remove smaller items.
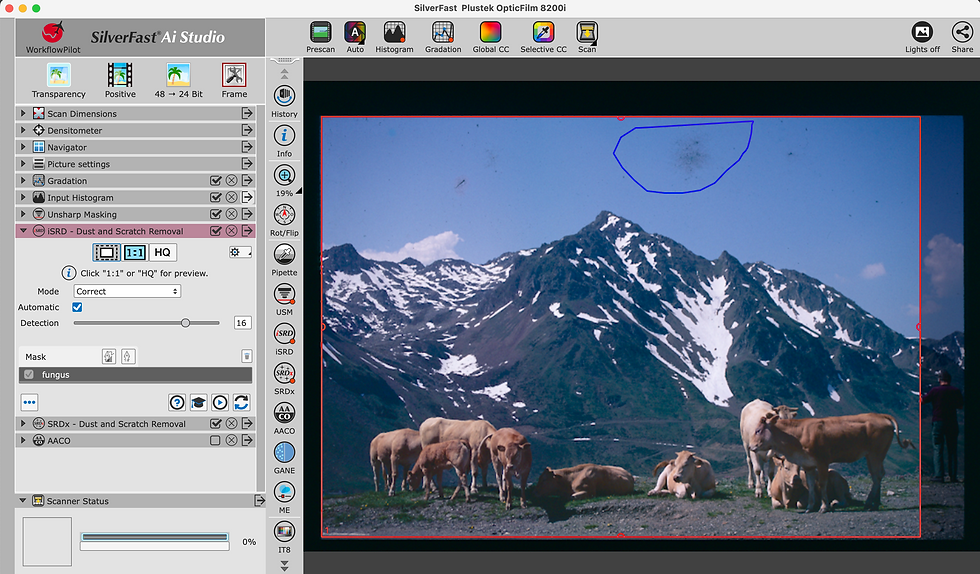
Classic example of mould/mildew/fungus. It's not nice to find and hard to remove quickly. You can isolate parts of the frame using the mask tool - essentially draw around the worst part and apply the maximum scratch removal filter!

Using Masks

As mentioned earlier, SilverFast also has a masking feature - essentially a selection tool used to limit the sometimes over-the-top effect of using too much filtration (especially the dust and scratches feature).


Here I've drawn a rough line around the nastiest outgrowth of fungus for some personal attention! Masking works OK, but when confronted with great big carpets of fungus like this, I also used a Clone Brush (Photoshop Elements but any application will do) to remove the worst of the damage. Scanning and restoring files like this is important because it preserves family memories that, given another five or ten years, will be beyond help.


Commentaires

Noté 0 étoile sur 5.
Pas encore de note

Ajouter une note

Contact Me

Thanks for submitting!

© 2035 by Turning Heads. Powered and secured by Wix

bottom of page